Admissions
Overview
Admissions Management handles confirmed applicants who have been converted from leads to admissions. Only confirmed admissions can be converted to students, and upon conversion, their status changes to "Admitted." Every confirmed admission must be assigned to a counsellor and linked to a valid academic program, batch, course, and appropriate fee structure.
Key Features
→ Manage admissions from various degree programs in a centralized interface.
→ Convert confirmed admissions to students with proper status tracking.
→ Assign counsellors for guidance and support throughout the enrollment process.
→ Handle bulk operations including import/export of admission data.
Admission Process
Creating and Managing Admissions
Manually create new admission records and manage
Steps to create new admissions:
- Navigate to Enroll → Admissions from the main menu.
- Click New Admission button at the top right corner.
- Fill in all required student and program details.
- Click Create Admission to save the new record.
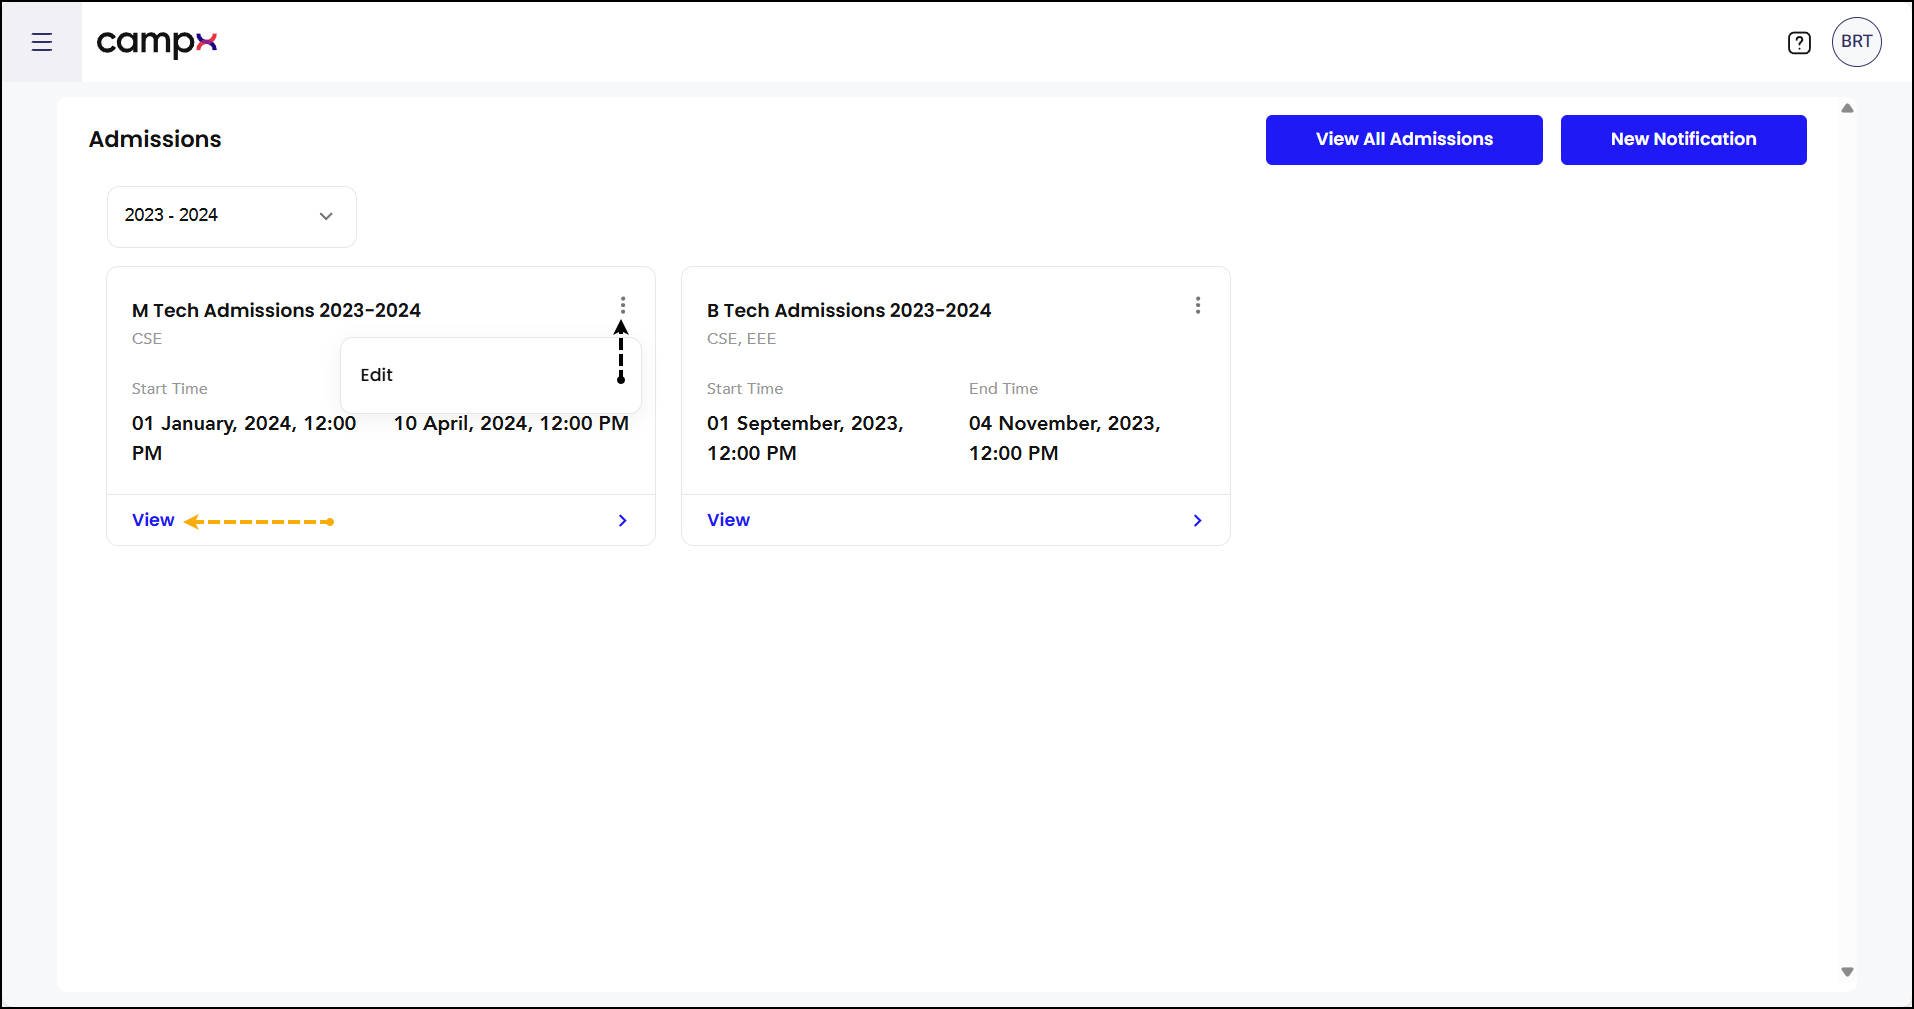
- Select the desired Year from the dropdown.
- View admission cards displaying various PG and UG degree programs.
- Click View > on any card to get detailed admission information.
- Fill and review all input including fee details.
- Confirm.

Steps to manage admission cards:
- Locate the admission card for your desired degree program.
- Click the kebab (3 dots) menu on the card.
- Select Edit Notification to modify the admission form details.
- Select Delete to remove the admission card if needed.
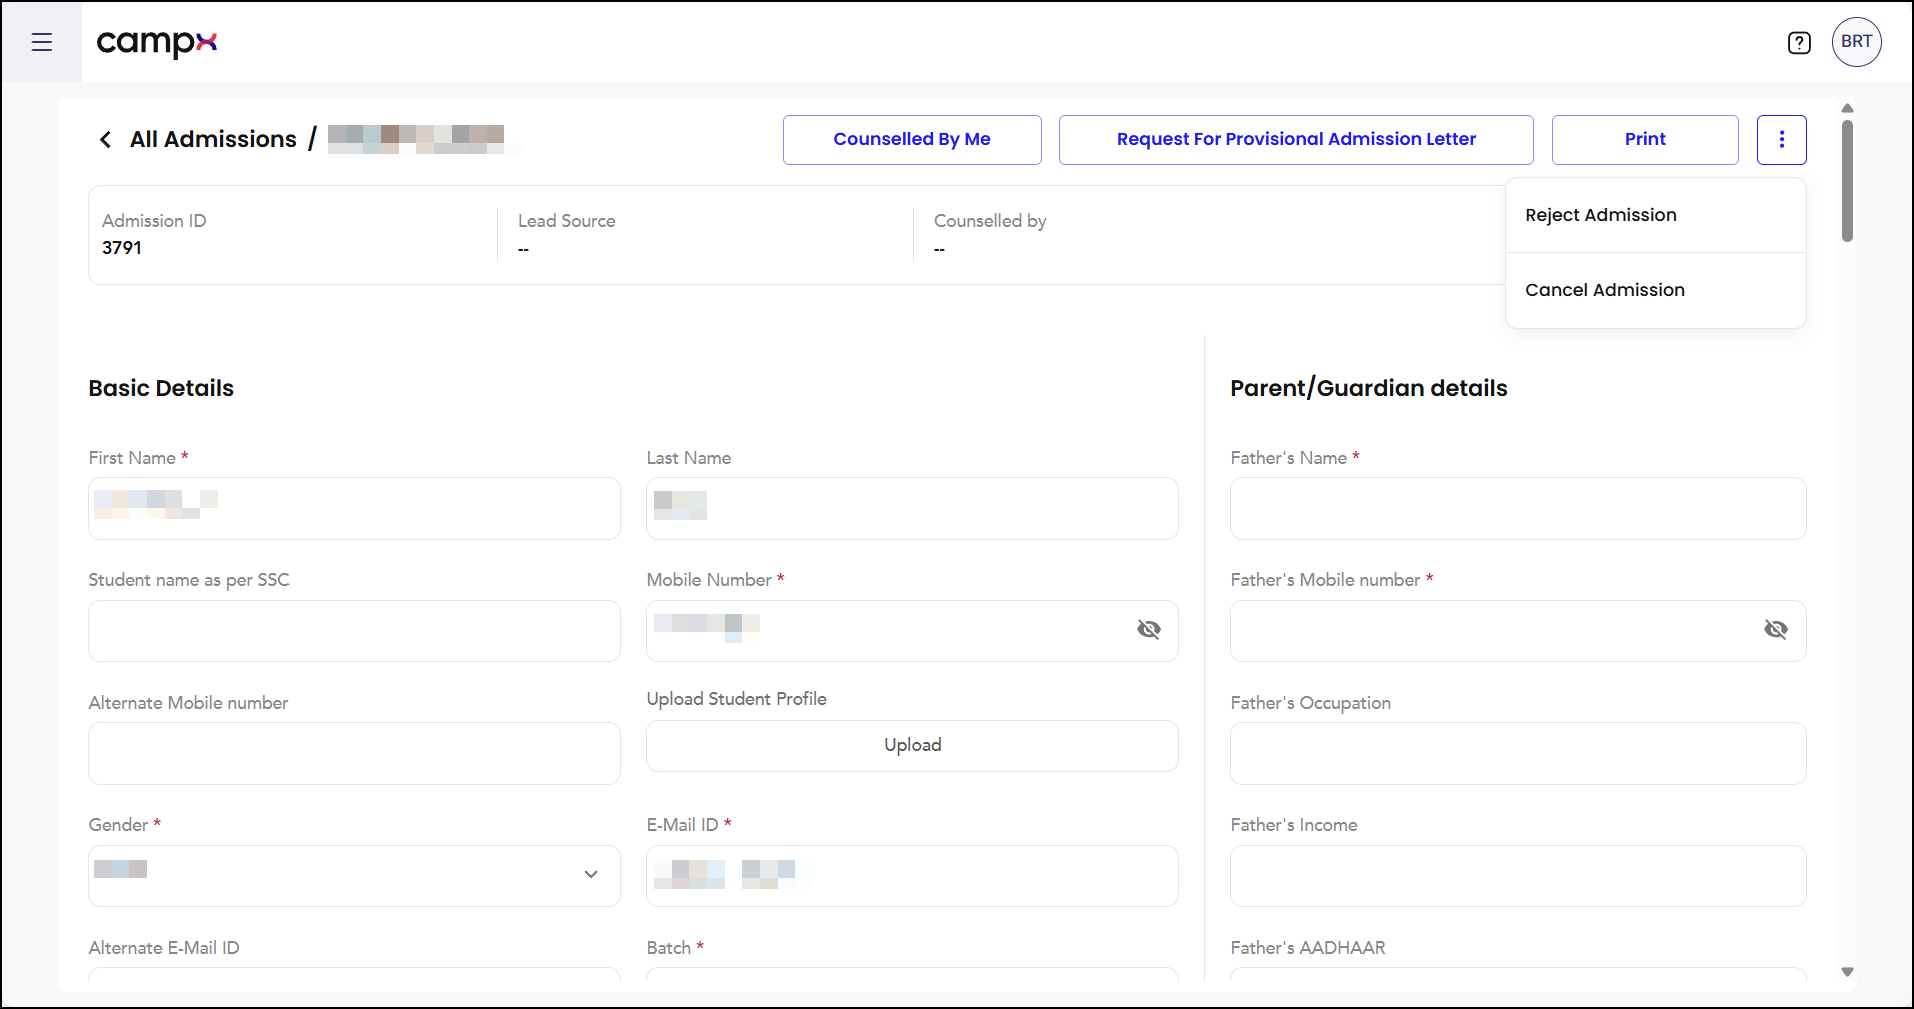
Steps to manage status:
- Open the detailed view of an admission.
- Click the kebab (3 dots) menu at the top right corner.
- Select from available options:
- Reject Admission - to decline the application.
- Cancel Admission - to cancel the admission process.
Bulk Import
Handle bulk admission data through import functionality
Follow these steps for the import process:
- From the main menu on the left side, navigate to Admin → Data Imports. The Data Imports interface will display available import options.
- Click the "Add New Data Import" button to create a new import session.
- Select data types: Admission Import / Admission Import by Hall Ticket Number / Admission Import by Roll No.
- Select the appropriate Import Type:
- Choose Insert to add new records
- Choose Update to modify existing data
- Click "Download Sheet" to access template options.
- In the sheet, choose appropriate fields. Enter and save your data following the template structure. Click "Upload" to upload the Excel sheet. Validate data.
- Refresh the page to view data.
- Click 'Start Import'.
Converting Leads to Admissions
Use the detailed view to convert in-progress leads to confirmed admissions by completing all required information.
Confirming Admission
Steps to confirm admission:
- Click View > on the relevant admission card.
- Click the View (eye) icon for the specific lead.
- Enter all required details in the admission form. Verify details thoroughly.
- Scroll to the bottom of the form. Click Confirm this Admission.
- Crosscheck Fee Overview, Concessions/Scholarships and review.
- The status will update from "In-Progress" to "Confirmed."
To revert student's confirmation,
- Locate admissions with "Confirmed" status.
- Click on View (eye) icon.
- Click the kebab (3 dots) menu at the top right corner.
- Click Un-confirm Admission.
Printing and Documentation
Generate printable documents and provisional admission letters for students and administrative records.
Steps for printing:
- Navigate to the admission details page.
- Click the Print button to generate a printout.
- For provisional admission letters, click Request for Provisional Admission Letter.
- The letter will be sent to the student's registered e-mail address.

Counsellor Management
Assign counsellors to leads and admissions for personalized guidance throughout the enrollment process.
Assigning Counsellor
Steps to Assign Counsellors:
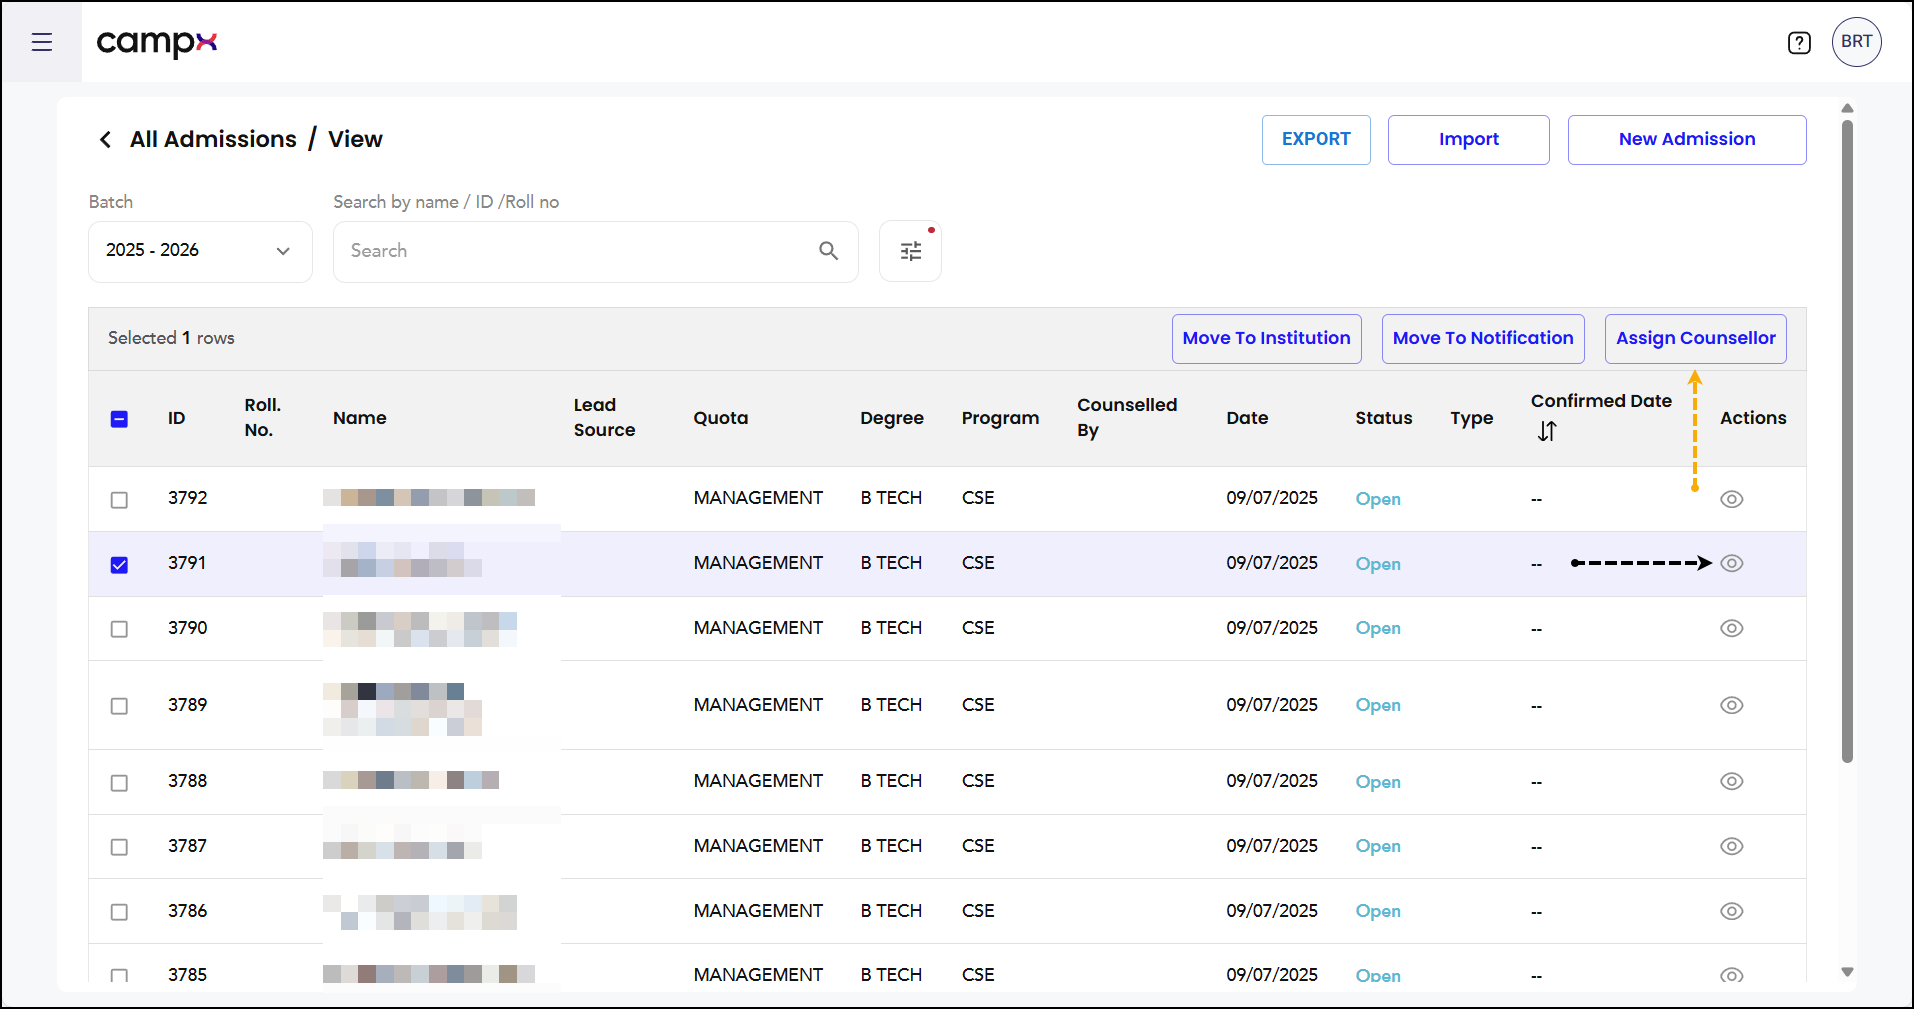
- Go to Enroll → Admissions from the main menu.
- Click 'View All Admissions'.
- To assign a counsellor:
- Check the checkbox against the student(s).
- Click Assign Counsellor button.
- Select the appropriate counsellor from the list.
- For leads with "Open" status, click Counselled by Me if you are the assigned counsellor.
Fee Synchronization
Sync fee structures for confirmed admissions to ensure accurate fee calculation and collection.
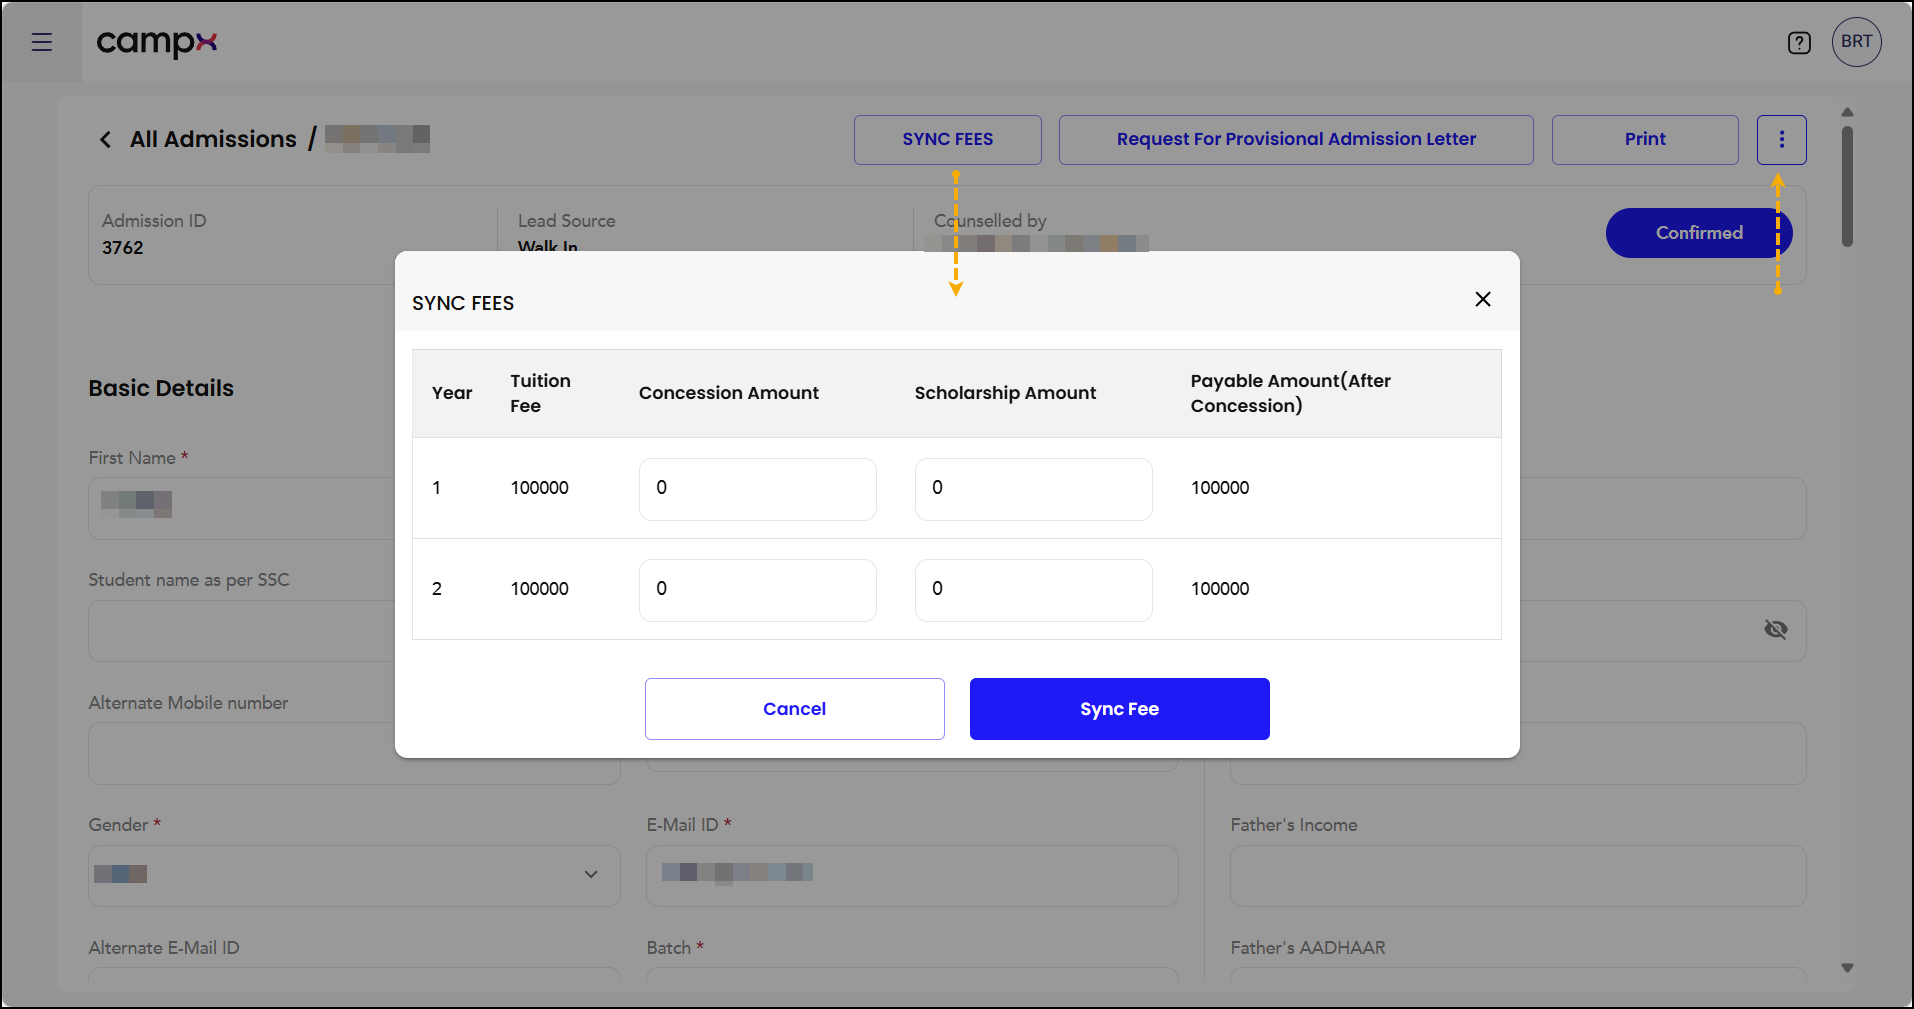
Steps to sync fees:
- Locate admissions with "Confirmed" status.
- Click on View (eye) icon.
- There is option to Sync Fee.
- In the sync window, select the appropriate fee structure.
- Click Sync Fee to apply changes made by management.
Creating Admission Notifications
Set up admission notification templates for different degree programs and admission phases.
Steps to create notifications:
- From the main Enroll → Admissions page, click New Notification
- Enter the notification details:
- Notification Name
- Degree program
- Batch information
- Timeframe
- Click Create Notification to save the template.
Student Movement and Management
Transfer students between institutions, programs, or move them to different admission notifications as needed.
Steps to manage student movement:
- Navigate to View All Admissions for comprehensive student listing.
- Check the checkbox against the desired student(s).
- Select the appropriate action:
- Move to Institution - transfer between campuses or degree programs.
- Move to Notification - relocate to different admission notifications.
- Delete Selected - remove students from the system.


Common Issues & Solutions
| ❗ Issue | ✅ Solution |
|---|---|
| Admission not converting to student | Ensure all required fields are completed and fee structure is properly configured |
| Counsellor assignment failing | Verify the counsellor is registered in the system and has appropriate permissions |
| Fee sync not working | Check if fee structures are properly set up under Configuration > Payments > Fee Structure |
| Import file rejected | Ensure the file follows the correct format and contains all required fields |
Useful Tips
- Configure fee structures for all programs and quotas before the admission season
- Use bulk import functionality for large admission datasets
- Regularly sync fees to reflect any changes made by management
- Verify all student information before confirming admissions
Support
Need Help?
Access Support Portal from the footer and click on "Login with CampX."