Applications
Overview
Applications is part of Enrollment that handles candidates who register from various sources like college websites, social media platforms, and other channels. When candidates pay the application fee via ATS (Application Tracking System), they become applicants and their names are listed under Applications for further processing and management.
Key Features
→ Manage single and bulk lead entries from multiple registration sources.
→ Track application status with comprehensive lead categorization (Hot/Warm/Cold).
→ Export and import functionality for efficient data management.
→ Lead nurturing system with counsellor assignment and follow-up tracking.
→ Convert qualified leads directly to admissions with detailed documentation support.
⚠️ Ensure the following are configured before using Applications:
- Lead statuses are properly set up
- Lead sources are defined
- Fee structure is configured
- Counsellors are added to the system
- User permissions are properly assigned
Adding New Applications
Use this feature to add individual candidates or import multiple applications at once. Single entries are ideal for walk-in candidates, while bulk import is efficient for large datasets from registration campaigns.
Single Application Entry
- Navigate to Enroll → Applications from the main menu.
- Click on Add New → + Add New Lead button.
- Fill in the lead details form:
- Enter candidate's personal information
- Select Lead Type from dropdown (Hot/Warm/Cold)
- Choose appropriate lead source
- Add any relevant notes
- Click Submit button to save the application.
Bulk Application Import
- Navigate to Enroll → Applications from the main menu.
- Click on Add New → Import Leads button.
- Select the Degree and Batch from dropdown menus.
- Click Next button to proceed.
- Choose your prepared Excel file or download the sample file template.
- Review the file format and ensure data matches the template structure.
- Click Upload Now button to import all applications.
Managing Application Data
Use export functionality to create reports or backup application data. This is useful for analysis, sharing with stakeholders, or maintaining records.
Exporting Applications
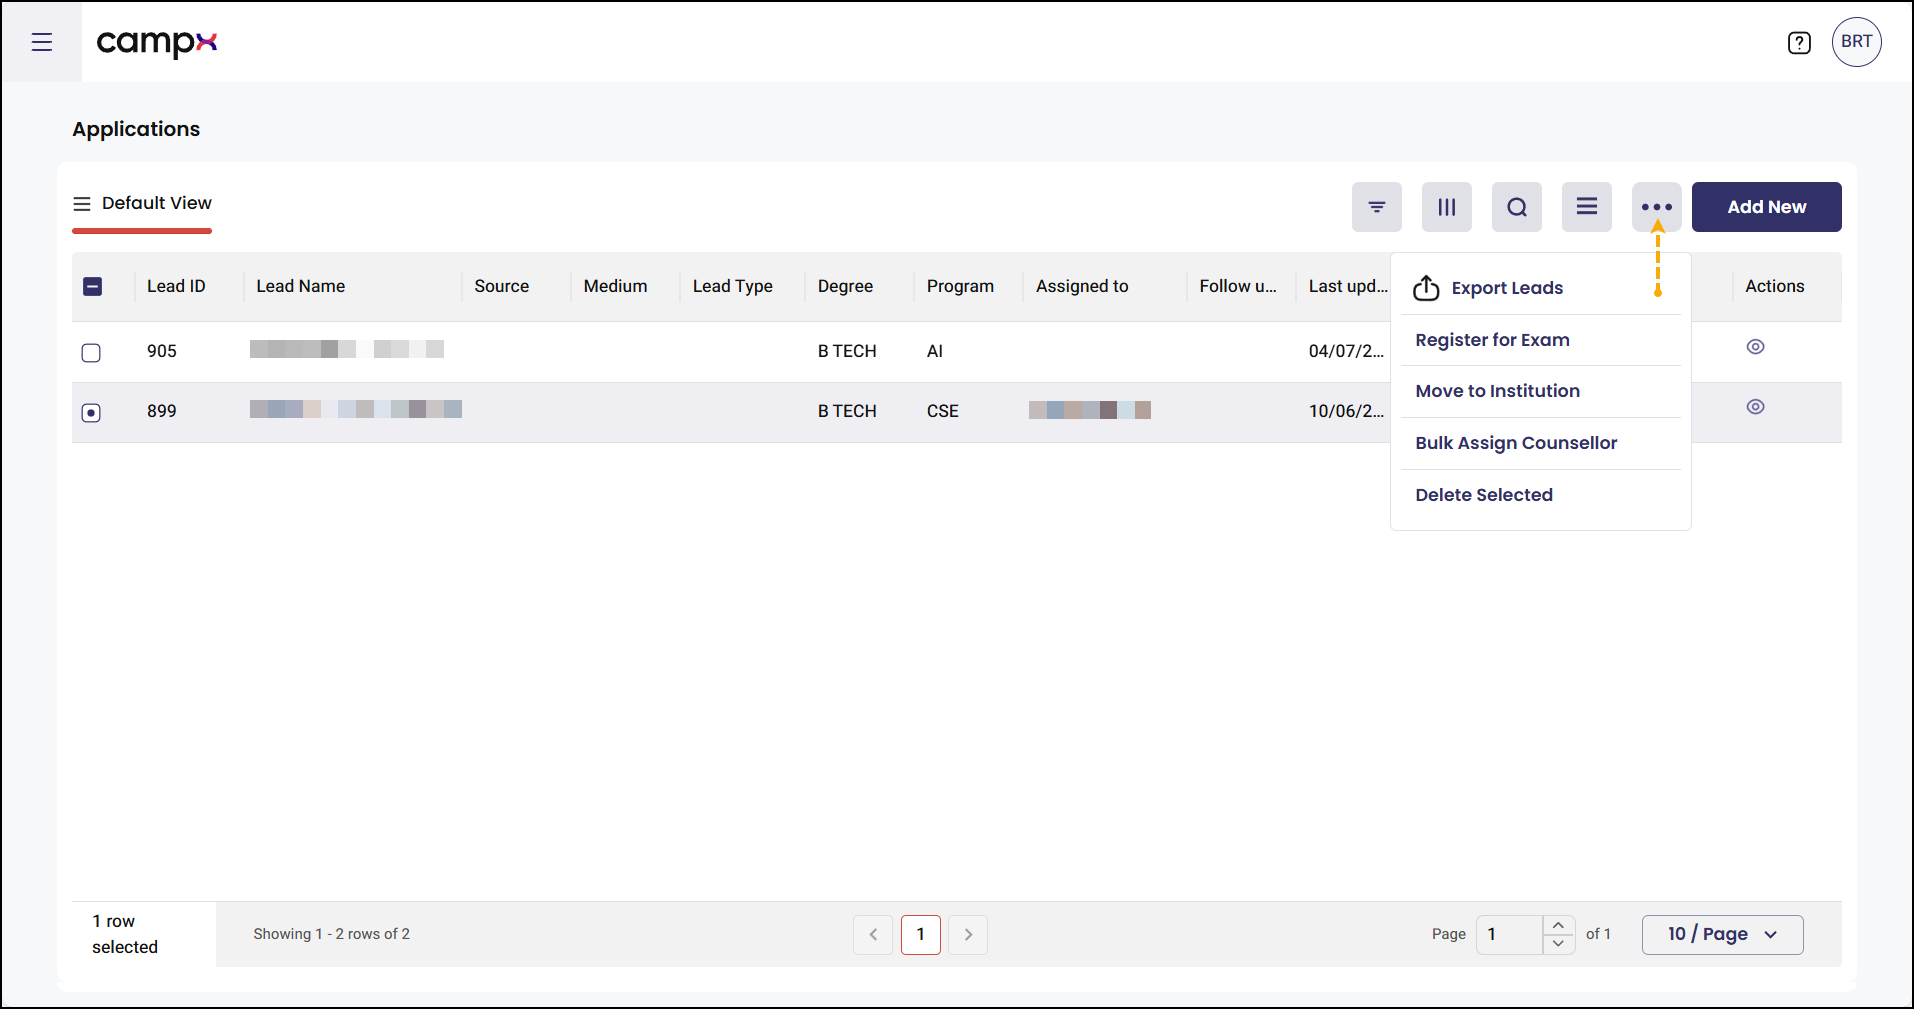
- In the Applications list view, click the 3 dots menu.
- Select Export Leads from the dropdown.
- Choose your preferred export format and filters.
- Download the generated file for your records.
Lead Management Actions
These bulk actions help streamline the management of multiple applications simultaneously, saving time and ensuring consistent processing.
Registering Leads for Examinations
- Select one or more leads from the applications list.
- Click the 3 dots menu in the actions area.
- Choose Register the Lead for Exams option.
- Select Exam Group from the available options.
- Choose Exam Mode (Offline or Online).
- Click Submit to register selected leads.
Moving Leads to Institution
- Select the target lead from the applications list.
- Click the 3 dots menu for bulk actions.
- Select Move the Lead to the Institution option.
- Enter required institutional details in the form.
- Click Submit to transfer the lead.
Bulk Counsellor Assignment
- Select multiple leads requiring counsellor assignment.
- Click the 3 dots menu for bulk actions.
- Choose Bulk Assign Counsellor option.
- Select the appropriate Counsellor from the available list.
- Click Submit to assign counsellor to selected leads.
Deleting Applications
- Select the lead you want to remove from the system.
- Click the 3 dots menu for bulk actions.
- Choose Delete the selected Lead option.
- Click Confirm to permanently remove the application.

Individual Lead Management
Use the View function to access comprehensive lead details, update information, and manage individual candidate progression through the enrollment process.
Viewing and Editing Lead Details
- Locate the target lead in the applications list.
- Click the View (eye) icon next to the lead name.
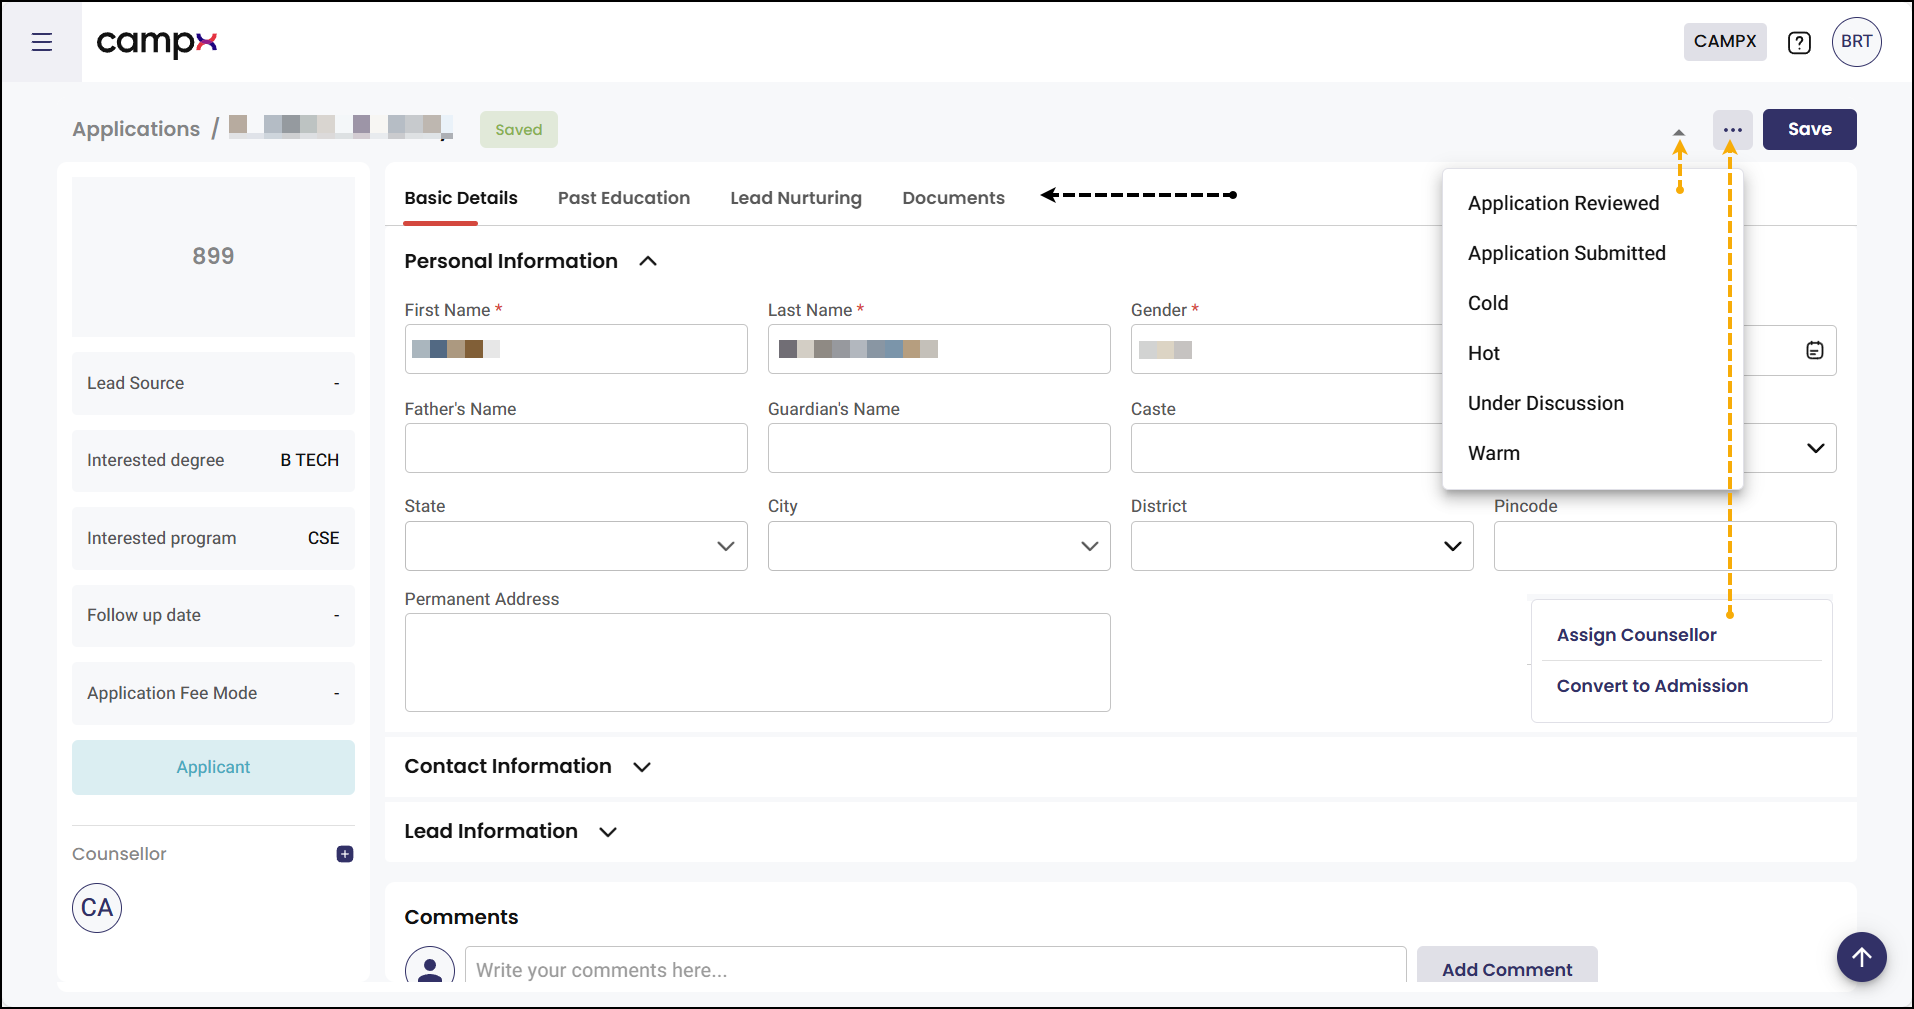
- Navigate through the available tabs to manage different aspects:
Basic Details Tab
- Update personal information
- Modify contact details
- Edit demographic information
- Save changes as needed
Past Education Tab
- Add educational background
- Upload academic transcripts
- Record qualification details
- Verify education credentials
Lead Nurturing Tab
- Track communication history
- Add follow-up notes
- Schedule future contact
- Monitor engagement levels
Documents Tab
- Upload supporting documents
- Organize required paperwork
- Verify document authenticity
- Maintain digital records
Individual Lead Actions
These actions are available for individual leads and provide precise control over each candidate's journey through the enrollment process.
Assigning Individual Counsellor
- Open the lead details using the View (eye) icon.
- Click the 3 dots menu preceding the Save button.
- Select Assign a Counsellor to that Lead option.
- Choose the appropriate counsellor from the dropdown.
- Click Submit to assign the counsellor.
Converting Lead to Admission
- Access the lead details through the View (eye) icon.
- Click the 3 dots menu preceding the Save button.
- Select Convert that potential Lead to Admission option.
- Complete the admission conversion form with required details.
- Click Submit to finalize the conversion.
Updating Application Status
- Open the lead details using the View (eye) icon.
- Click the down arrow preceding the 3 dots menu.
- Select new status from available options:
- Application Submitted
- Application Reviewed
- Cold
- Warm
- Hot
- Status will be updated automatically.

Data Management Tools
Use these tools to efficiently locate, organize, and analyze application data. The activity log automatically tracks all changes for audit purposes.
Using Filter and Search Functions
- Filter Icon: Use to narrow results by status, date, or other criteria
- Sort Icon: Organize applications by name, date, or priority
- Search Bar: Find specific applications using name, email, or phone number
- Menu Icons: Access additional tools and export options
Activity Log Tracking
The system automatically records all activities in each tab:
- Basic Details: Tracks information updates and modifications
- Past Education: Records education data changes and additions
- Lead Nurturing: Logs communication and follow-up activities
- Documents: Monitors document uploads and updates
Common Issues & Solutions
| ❗ Issue | ✅ Solution |
|---|---|
| Import file fails to upload | Ensure file follows the exact sample template format and contains valid data |
| Lead status not updating | Refresh the page and verify you have proper permissions to modify lead status |
| Counsellor assignment not working | Check that the counsellor is properly registered in the system as an active user |
| Export function not responding | Clear browser cache and try again, or use a different browser |
| Documents not uploading | Verify file size is within limits and file format is supported |
💡 Best Practices:
- Download and review the sample Excel template before bulk importing
- Regularly update lead statuses to maintain accurate pipeline tracking
- Use consistent naming conventions for uploaded documents
- Export data regularly for backup purposes
- Assign counsellors promptly to ensure timely follow-up
✅ Do's:
- Keep lead information current and accurate
- Use appropriate lead types (Hot/Warm/Cold) for better tracking
- Document all interactions in the Lead Nurturing tab
- Follow up on leads within recommended timeframes
❌ Don'ts:
- Don't delete leads without proper authorization
- Don't skip document verification steps
- Don't assign multiple counsellors to the same lead without coordination
Support
Need Help?
Access Support Portal from the footer and click on "Login with CampX."