Bus Route Assignment
Overview
Bus Route Assignment enables administrators to configure and manage bus transportation services by assigning specific buses to routes with detailed seating configurations. This module allows you to set up boarding points, configure seat layouts, and implement category-based access control for students and staff.
Key Features
→ Assign buses to specific routes with date validity periods
→ Configure boarding points with transportation costs and timing
→ Set up seating layouts with window, aisle, and deleted seat types
→ Implement category-based seating for Men, Women, Staff, and Unreserved seats
→ Institution-specific seat assignments for multi-institution setups
→ Real-time seating statistics and bulk assignment actions
Navigation Path
Configuration → Transportation → Bus Route Assignment
Steps to Configure Bus Route Assignment
Step 1: Create Bus Route Assignment
- Navigate to Configuration → Transportation → Bus Route Assignment from the main menu
- Ensure you have created buses and routes beforehand
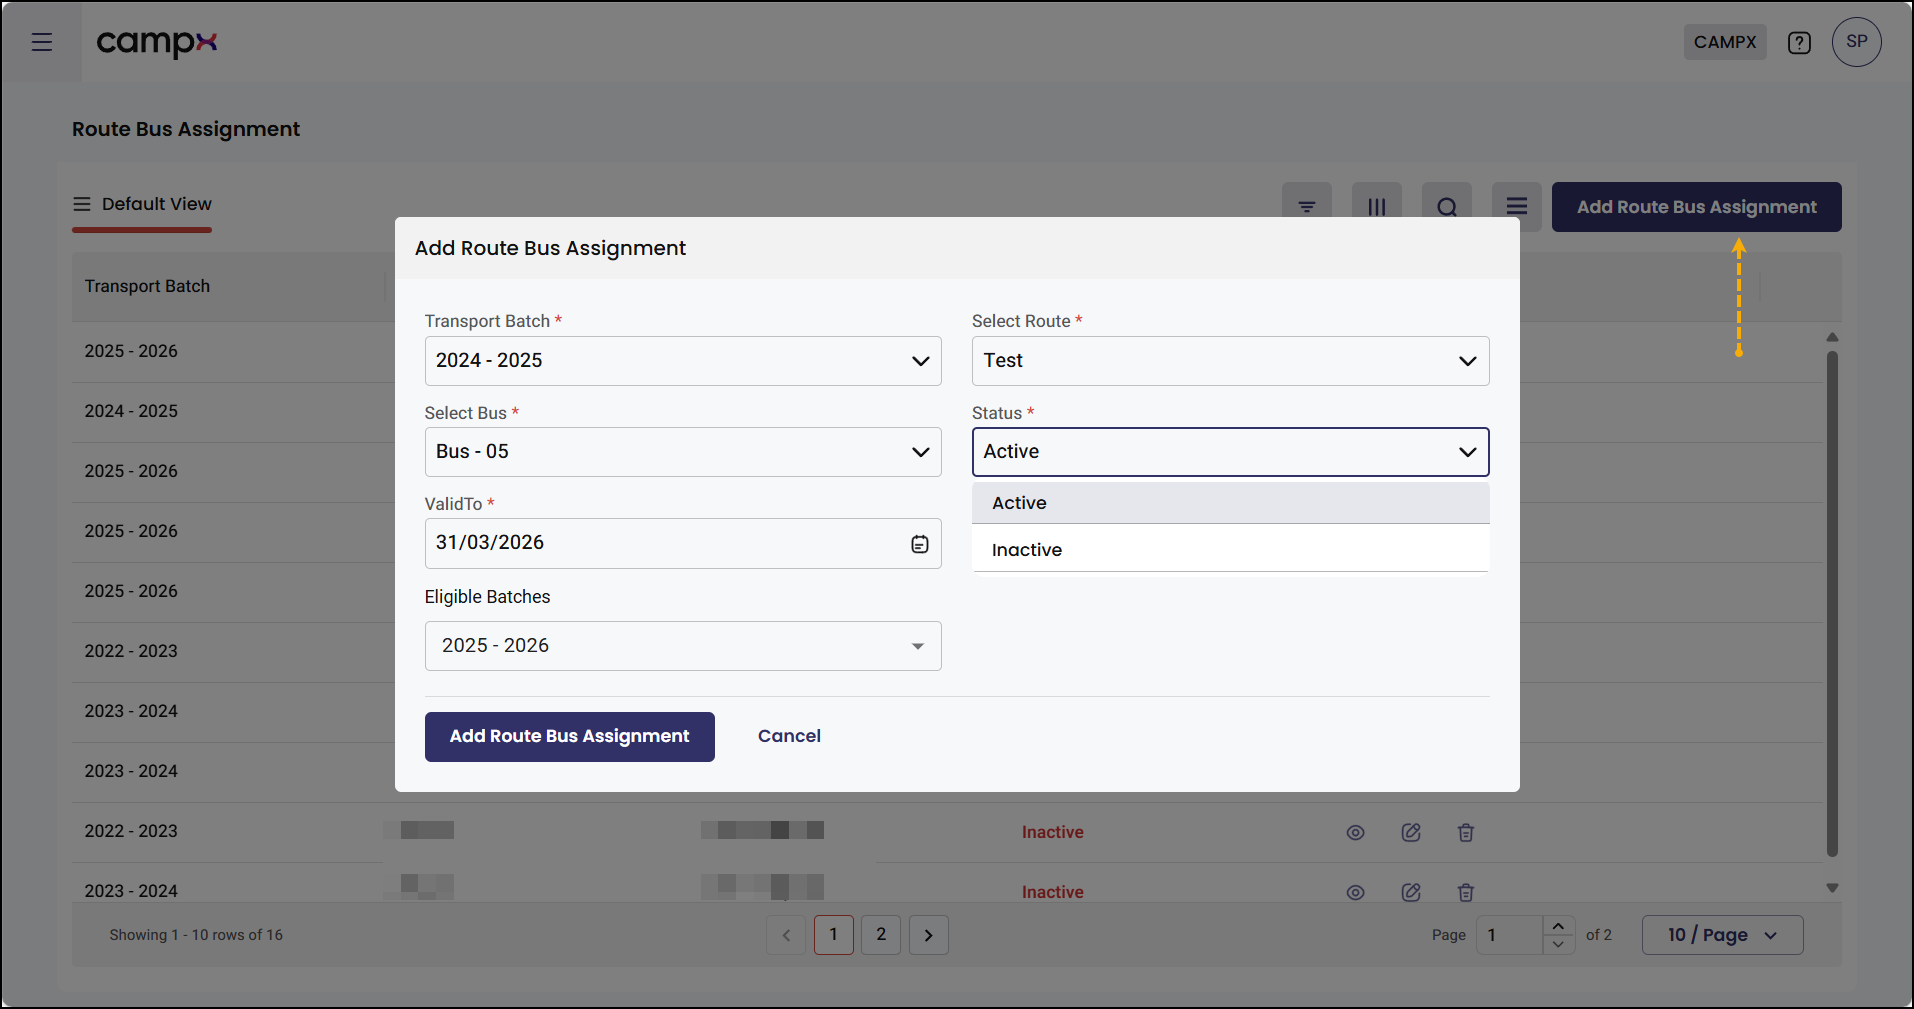
Follow the steps below to create a new bus route assignment:
- Click on Add Bus Route Assignment button
- Select Transport Batch from the dropdown menu
- Choose the Bus that will operate on the selected route
- Enter Date of Validity (the date until which the bus will operate on this route)
- Select Eligible Batches that can use this bus service
- Choose the Route from the dropdown [routes must be created under Configuration → Transportation → Routes]
- Set the Status (default is Active - buses automatically become inactive after validity date expires)
- Enter Remarks if any additional information is needed
- Click Add Route Bus Assignment button to confirm

Step 2: Edit or Remove Assignments
- Use Edit icon to modify existing bus route assignments
- Use Delete icon to remove assignments when no longer needed
To manage existing assignments:
- Locate the assignment in the list
- Click Edit icon to modify details
- Click Delete icon to remove the assignment (if no longer needed)
Step 3: Configure Boarding Points
- Boarding points must be created under Configuration → Transportation → Boarding Points first
- Each boarding point includes transportation cost and boarding time
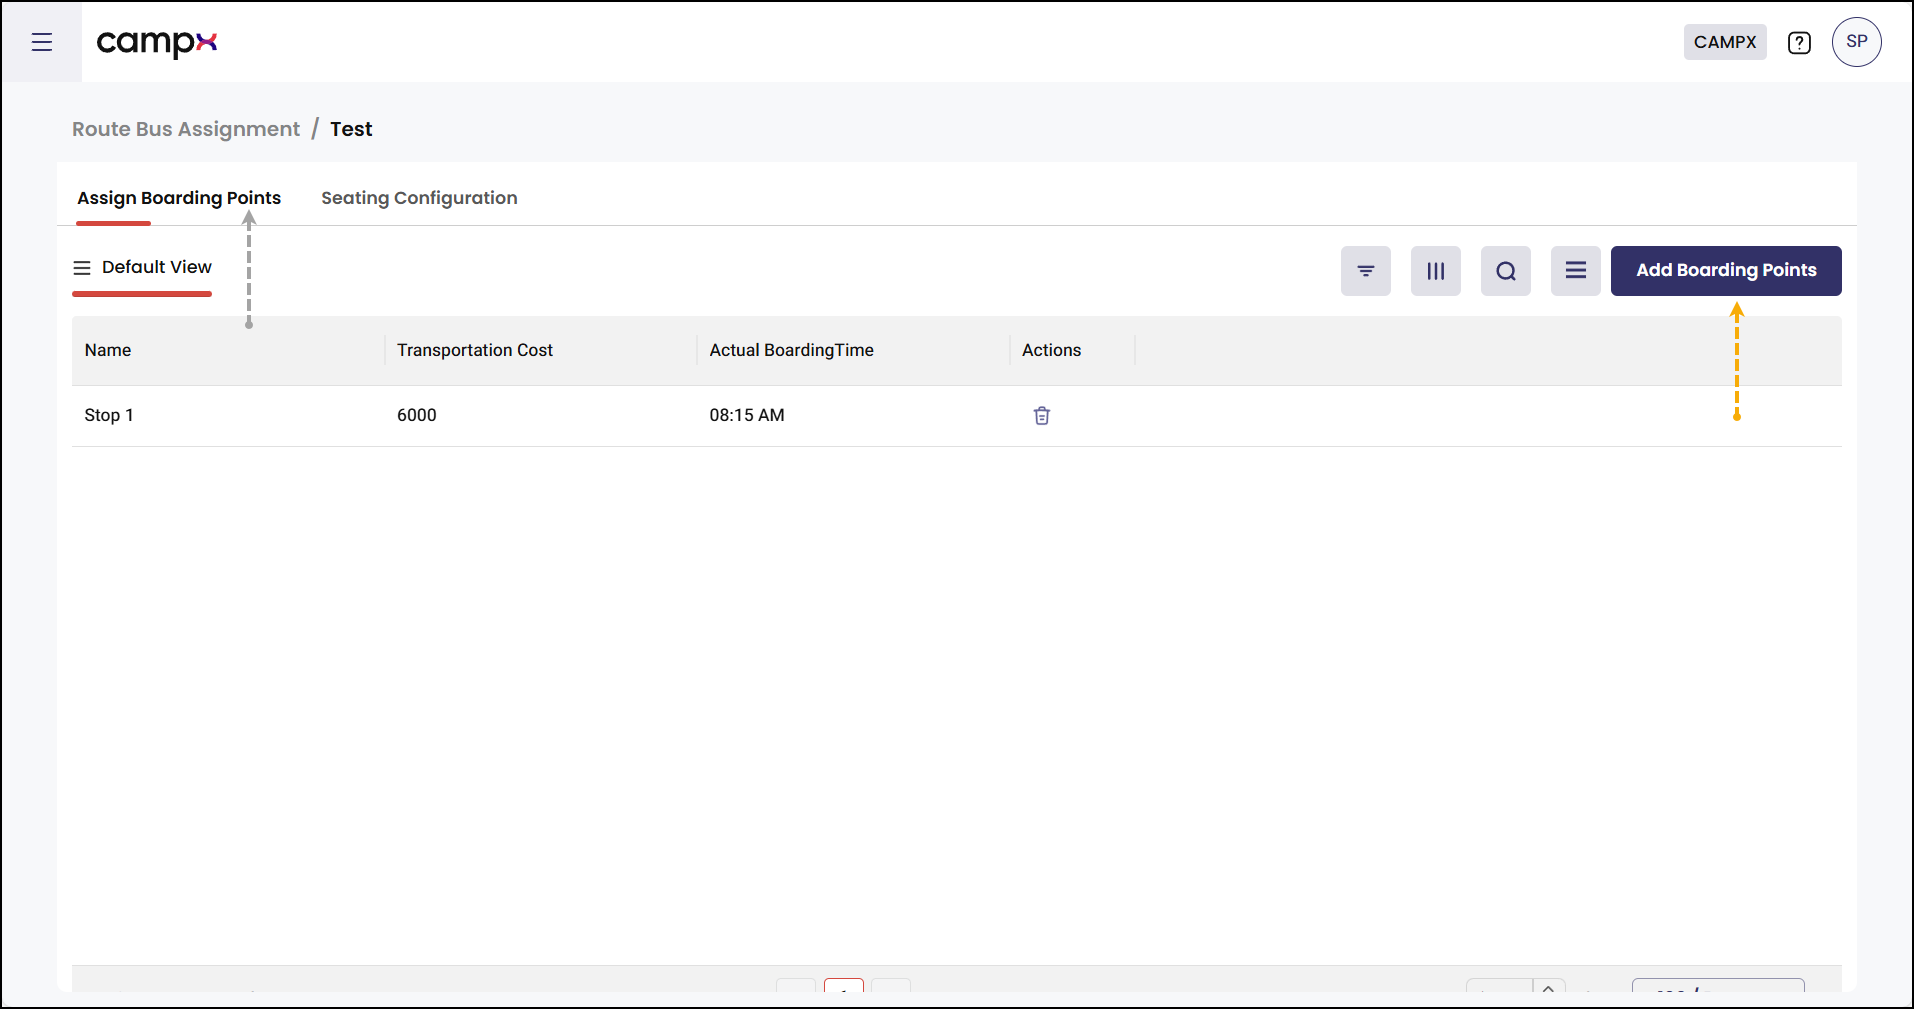
Follow the steps below to add boarding points:
- Click the View (eye) icon for the desired bus route assignment
- Click Add Boarding Points
- Select Boarding Points from the available options
- Enter Transportation Cost (cost from boarding point to destination campus)
- Specify Actual Boarding Time for student pickup
- Click Add Boarding Point button
- Review added boarding points in the Assign Boarding Points tab
- Use Edit or Delete options under Actions column as needed

Step 4: Configure Seating Layout
- The seating grid layout is determined by Row Count and Column Count set during bus creation
- Configure seat types before assigning them to specific groups
Follow the steps below to set up seat layout:
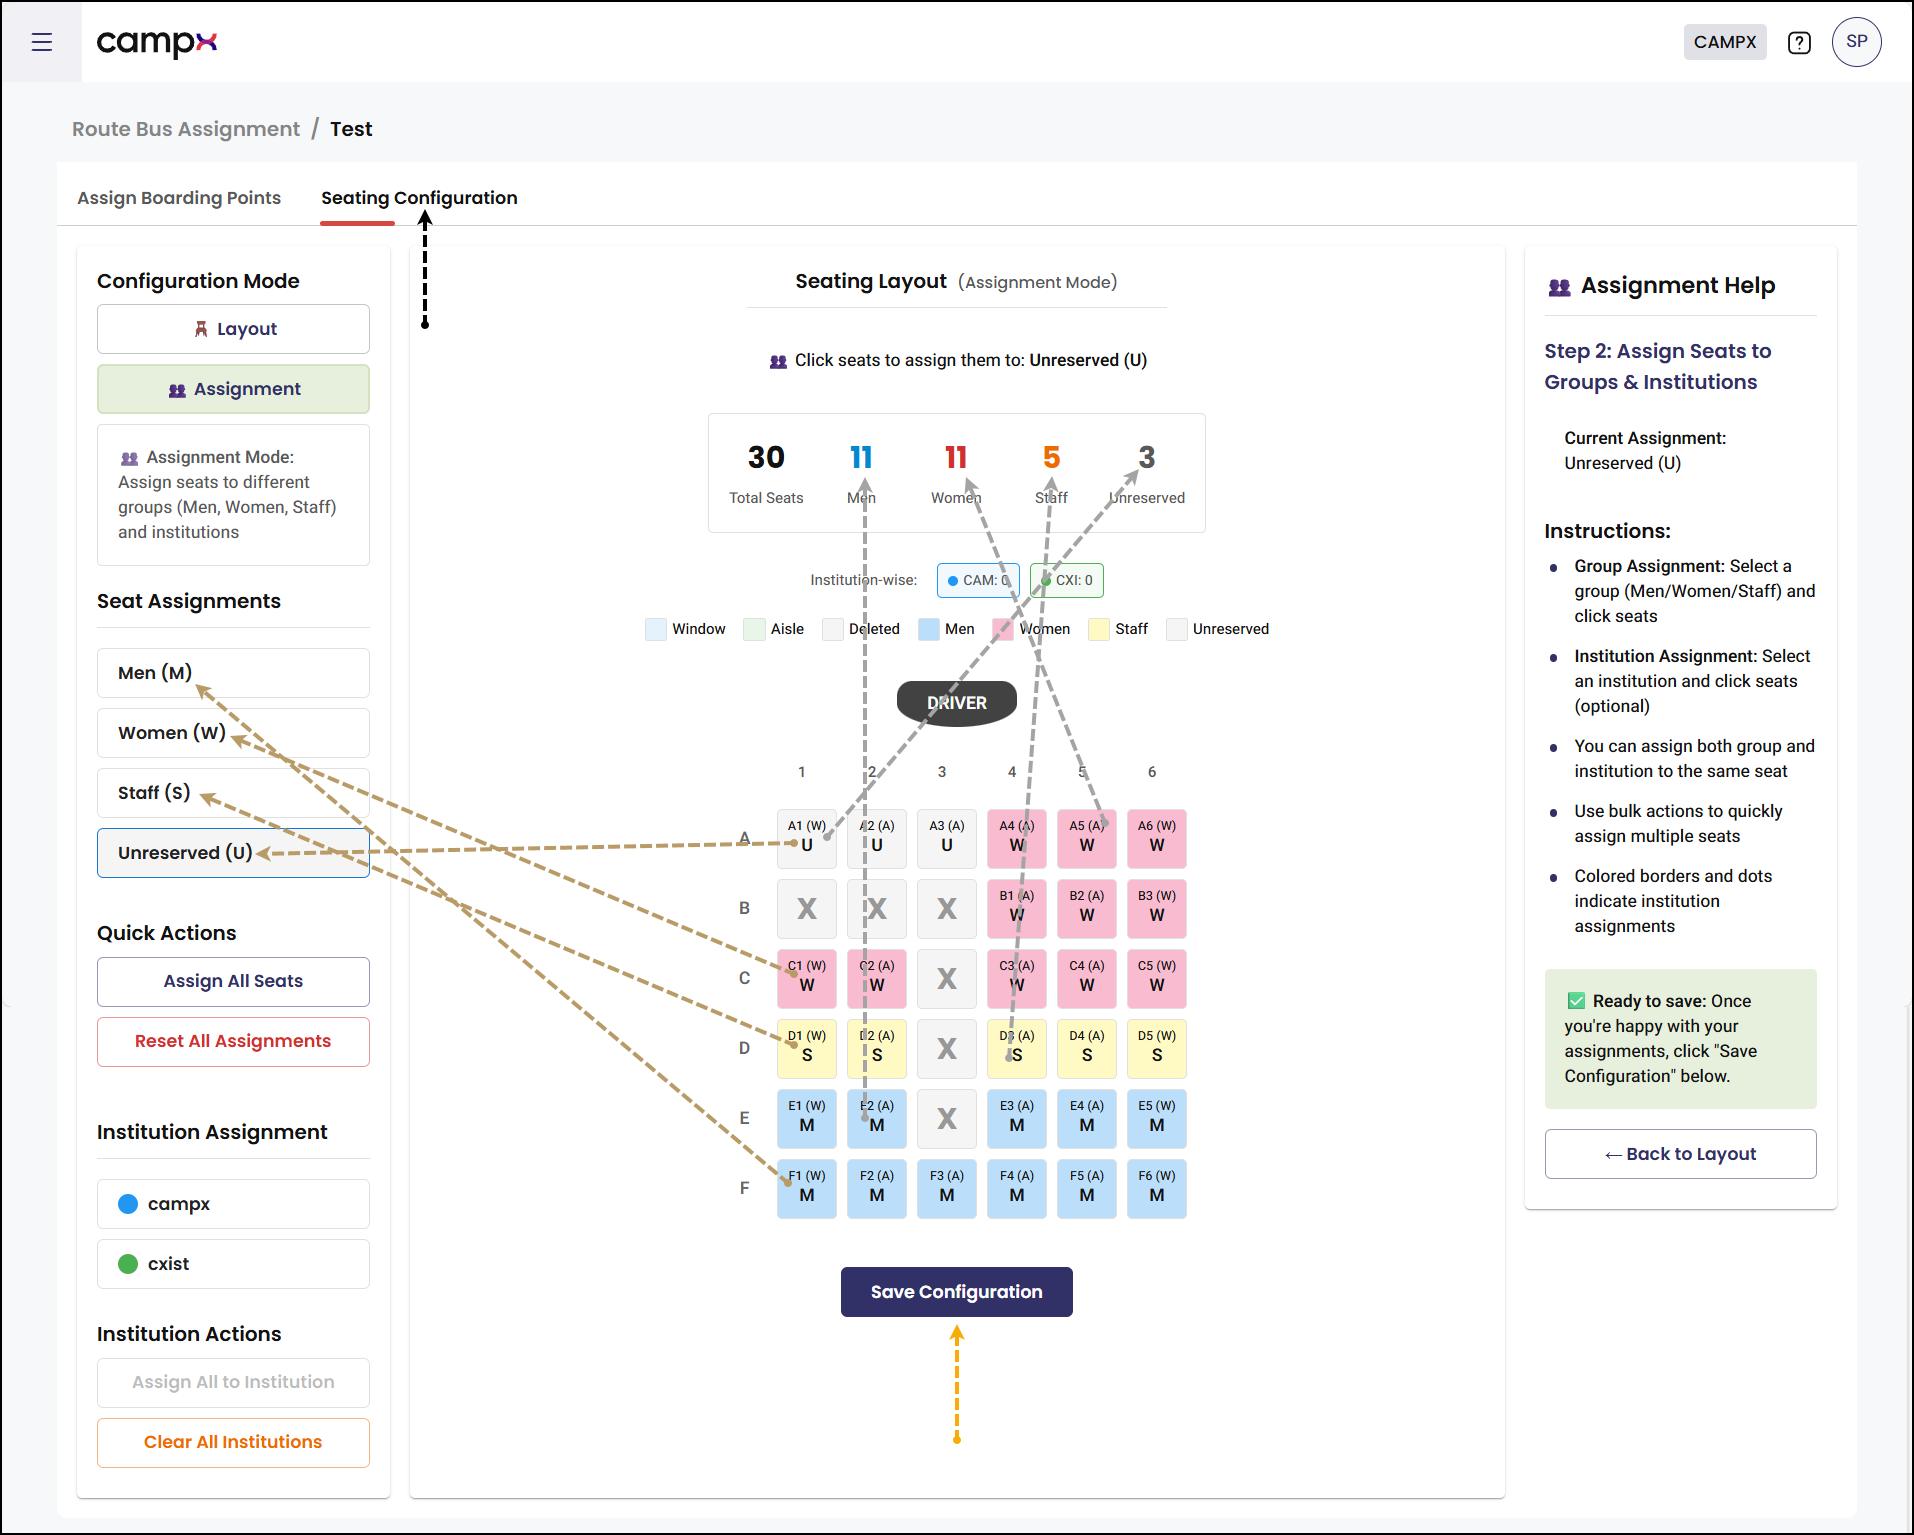
- Navigate to Seating Configuration tab
- Select Configuration Mode for Layout
- Choose seat type from the left panel:
- Window Seat - seats next to windows
- Aisle Seat - seats next to the aisle
- Deleted - seats to be removed (for doors, pathway, obstacles)
- Click on seats in the layout to assign the selected type
- Seats for Deleted - where doors, pathway, or obstacles are there - are shown as "X"
- Click Save Configuration button to finalize layout
Step 5: Configure Seat Assignments
- Category-based assignments control which students can book specific seats
- Institution assignments are optional for multi-institution setups
Follow the steps below to configure seat assignments:
- Select Configuration Mode for Assignment
- Group Assignment:
- Choose a group from the left panel (Men/Women/Staff/Unreserved)
- Click on seats in the layout to assign them to the selected group
- Current assignment mode is displayed at the top (e.g., "Click seats to assign them to: Men (M)")
- Institution Assignment (Optional):
- Select an institution from the Institution Assignment section
- Click seats to assign them to specific institutions
- Colored borders and dots indicate institution assignments
- Monitor Assignment Statistics:
- View real-time statistics showing total seats available
- Check distribution across Men, Women, Staff, and Unreserved categories
- Review institution-wise breakdown with colored indicators
- Use Bulk Actions:
- Assign All Seats: Assigns all seats to currently selected group
- Reset All Assignments: Removes all seat assignments for fresh setup
- Assign All to Institution: Assigns all seats to selected institution
- Clear All Institutions: Removes all institution-specific assignments
- Click Save Configuration button to finalize seating arrangement

Expected Results
After completing the configuration:
- Bus route assignments are active and visible to students during registration
- Students can only select seats assigned to their category (Male/Female/Staff)
- Transportation costs are automatically calculated based on selected boarding points
- Seating layout reflects the configured arrangement with proper access controls
Important Notes
The seating layout grid (rows × columns) is established during bus creation in Configuration → Transportation → Buses. The Row Count and Column Count specified during bus setup determines the seating grid layout used in this Bus Route Assignment interface.
The seating assignments enforce access restrictions during student registration:
- Female students can only select seats designated for female students
- Male students have access exclusively to seats assigned to male students
- Staff members can only choose from seats allocated to their category
- Authentication: Students register using roll number/admission number, staff use employee ID/institutional email
Students can only register for bus seats on routes with an "Active" status. Routes with "Inactive" status are excluded from student selection; this prevents registration conflicts with discontinued or temporarily suspended bus services.
Use 'Inactive' status option sparingly, only when essential, as it directly affects bus availability for student registration. Always promptly inform students, staff, and parents to prevent confusion.
Institutions preferring open seating can leave seats as "Unreserved," allowing any registered user to select any available seat during registration.
Common Issues & Solutions
| 🛑 Issue | ✅ Solution |
|---|---|
| Cannot see buses in dropdown | Create buses first under Configuration �→ Transportation → Buses |
| Routes not available for selection | Add routes under Configuration → Transportation → Routes |
| Seating grid appears incorrect | Check Row Count and Column Count in bus configuration |
| Students cannot book certain seats | Verify category assignments match student profiles |
| Boarding points not showing | Create boarding points under Configuration → Transportation → Boarding Points |
FAQs
Q: What happens when the validity date expires?
A: The bus route assignment automatically becomes inactive, and students cannot book seats on that bus.
Q: Can I assign the same seat to multiple categories?
A: No, each seat can only be assigned to one category (Men/Women/Staff/Unreserved) at a time.
Q: How do institution assignments work with category assignments?
A: Institution assignments are additional filters. A seat can have both category and institution assignments, providing dual-level access control.
Q: Can I modify seating configuration after students have booked seats?
A: Yes, but changes may affect existing bookings. It's recommended to make seating changes before opening registration.